
Architecture Overview 6.0
AngularDart (which we usually call simply Angular in this documentation) is a framework for building client apps in HTML and Dart. It is published as the angular package, which is available via the Pub tool.
You write Angular apps by composing HTML templates with Angularized markup, writing component classes to manage those templates, adding application logic in services, and boxing components and services in modules.
After you launch the app, Angular takes over, presenting your app content in a browser and responding to user interactions according to the instructions you’ve provided.
Of course, there is more to it than this. You’ll learn the details in the pages that follow. For now, focus on the big picture.
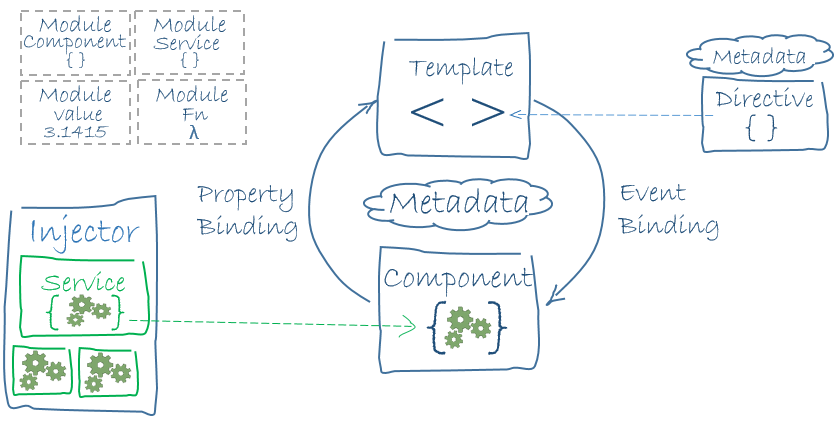
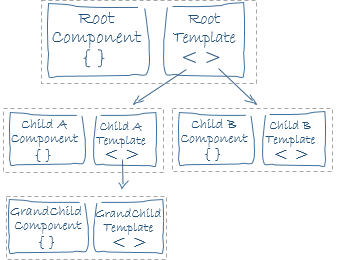
The architecture diagram identifies the eight main building blocks of an Angular app:
The code referenced on this page is available as a live example (view source).
Modules

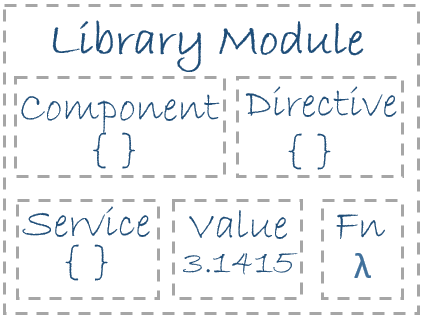
Angular apps are modular; that is, apps are assembled from many modules.
In this guide, the term module refers to a Dart compilation unit, such
as a library, or a package. If a Dart file has no library or part
directive, then that file itself is a library and thus a compilation
unit. For more information about compilation units, see
the chapter on “Libraries and Scripts” in the
Dart Language Specification.
Every Angular app has at least one module, the root module. While the root module may be the only module in a small app, most apps have many more feature modules, each a cohesive block of code dedicated to an application domain, a workflow, or a closely related set of capabilities.
The simplest of root modules defines a single root component class such as this one:
lib/app_component.dart (class)
class AppComponent {}By convention, the name of the root component is AppComponent.
Angular libraries
Angular ships as a collection of libraries within the angular package. The main Angular library is angular, which most app modules import as follows:
import 'package:angular/angular.dart';The angular package includes other important libraries, such as angular.security.
Components
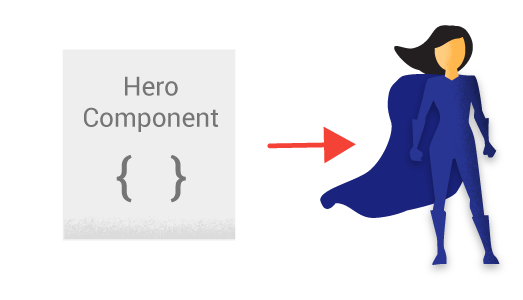
A component controls a patch of screen called a view.
For example, the following views are controlled by components:
- The app root with the navigation links.
- The list of heroes.
- The hero editor.
You define a component’s application logic—what it does to support the view—inside a class. The class interacts with the view through an API of properties and methods.
In the following example, the HeroListComponent has a heroes property that
returns a list of heroes that it acquires from a service.
HeroListComponent defines a selectHero() method that sets a selectedHero
property when the user clicks to choose a hero from the list.
lib/src/hero_list_component.dart (class)
class HeroListComponent implements OnInit {
  List<Hero> heroes;
  Hero selectedHero;
  final HeroService _heroService;

  HeroListComponent(this._heroService);

  void ngOnInit() async {
    heroes = await _heroService.getAll();
  }

  void selectHero(Hero hero) {
    selectedHero = hero;
  }
}
Angular creates, updates, and destroys components as the user moves through the
app. Your app can take action at each moment in this lifecycle through optional
lifecycle hooks, like ngOnInit() declared above.
Templates
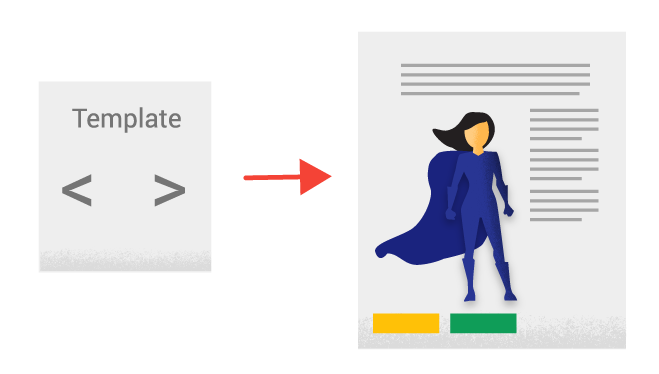
You define a component’s view with its companion template. A template is a form of HTML that tells Angular how to render the component.
A template looks like regular HTML, except for a few differences. Here is a
template for the example HeroListComponent:
lib/src/hero_list_component.html
<h2>Hero List</h2>

<p><i>Pick a hero from the list</i></p>
<ul>
  <li *ngFor="let hero of heroes" (click)="selectHero(hero)">
    {{hero.name}}
  </li>
</ul>

<hero-detail *ngIf="selectedHero != null" [hero]="selectedHero"></hero-detail>
The template uses typical HTML elements like <h2> and <p>. It also
includes code that uses Angular’s template syntax like
*ngFor, {{hero.name}}, (click), [hero], and <hero-detail>.
In the last line of the template, the <hero-detail> tag is a custom element
that represents a new component, HeroDetailComponent. The new component (code
not shown) presents facts about the hero that the user selects from the list
presented by the HeroListComponent. The HeroDetailComponent is a child
of the HeroListComponent.
Notice how <hero-detail> rests comfortably among native HTML elements. You can
mix custom components with native HTML in the same layouts.
Metadata

Metadata tells Angular how to process a class.
Looking back at the code for HeroListComponent, you can see
that it’s just a class. There is no evidence of a framework, no Angular-specific
code.
In fact, HeroListComponent really is just a class. It’s not a component
until you tell Angular about it. To tell Angular that HeroListComponent is a
component, attach metadata to the class. In Dart, you attach metadata by
using an annotation.
Here’s some metadata for HeroListComponent. The @Component annotation
identifies the class immediately below it as a component class:
lib/src/hero_list_component.dart (metadata)
@Component(
  selector: 'hero-list',
  templateUrl: 'hero_list_component.html',
  directives: [coreDirectives, formDirectives, HeroDetailComponent],
  providers: [ClassProvider(HeroService)],
)
class HeroListComponent implements OnInit {
  // ···
}
The @Component annotation accepts parameters supplying the
information Angular needs to create and present the component and its view.
The example HeroListComponent uses the following @Component parameters:
-
selector: a CSS selector that tells Angular to create and insert an instance of this component where it finds a<hero-list>tag in parent HTML. For example, if an app’s HTML contains<hero-list></hero-list>, then Angular inserts an instance of theHeroListComponentview between those tags. -
templateUrl: the module-relative address of this component’s HTML template, shown above. -
directives: a list of the components or directives that this template requires. For Angular to process app tags that appear in a template, like<hero-detail>, you must declare the tag’s corresponding component in thedirectiveslist. -
providers: a list of dependency injection providers for services that the component requires. This is one way to tell Angular that the component’s constructor requires aHeroServiceso it can get the list of heroes to display.

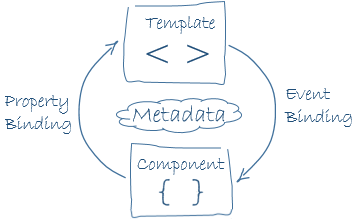
The metadata in the @Component tells Angular where to get the major building
blocks you specify for the component.
The template, metadata, and component together describe a view.
Apply other metadata annotations in a similar fashion to guide Angular behavior.
@Input and @Output are two of the more popular annotations.
The architectural takeaway is that you must add metadata to your code so that Angular knows what to do.
Data binding
Without a framework, you’re responsible for pushing data values into the HTML controls and turning user responses into actions and value updates. Writing such push/pull logic by hand is tedious and error prone, and the result is often difficult to read.
Angular supports data binding, a mechanism for coordinating parts of a template with parts of a component. Add binding markup to the template HTML to tell Angular how to connect the template and the component.
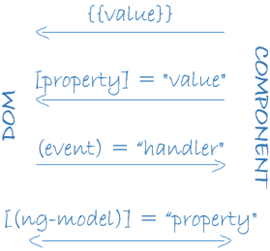
As the diagram shows, there are four forms of data binding syntax. Each form has
a direction: to the DOM, from the DOM, or in both directions.
The HeroListComponent example template includes three of the
four forms of data binding syntax:
lib/src/hero_list_component.html (binding)
<li>{{hero.name}}</li>
<hero-detail [hero]="selectedHero"></hero-detail>
<li (click)="selectHero(hero)"></li>
Here are the three ways that the example uses data binding syntax:
-
The
{{hero.name}}interpolation displays the component’shero.nameproperty value within the<li>element. -
The
[hero]property binding passes the value ofselectedHerofrom the parentHeroListComponentto theheroproperty of the childHeroDetailComponent. -
The
(click)event binding calls the component’sselectHeromethod when the user clicks a hero’s name.
The fourth form of data binding is
two-way data binding.
Two-way binding combines property and event binding in a single
notation, using the ngModel directive.
In two-way binding, a data property value flows to the input box from the
component as with property binding. The user’s changes also flow back to the
component, resetting the property to the latest value, as with event binding.
Here’s an example of two-way binding from the HeroDetailComponent template:
lib/src/hero_detail_component.html (ngModel)
<input [(ngModel)]="hero.name">Angular processes all data bindings once per JavaScript event cycle, from the root of the app component tree through all child components.
Data binding plays an important role in communication between a template and its
component.
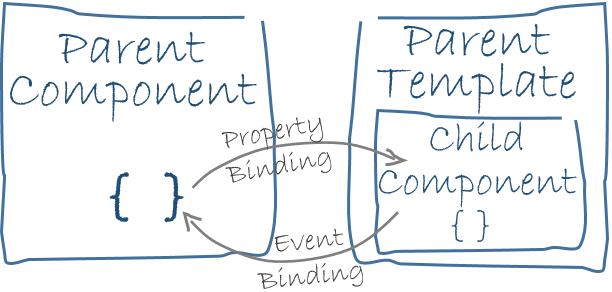
Data binding is also important for communication between parent and child
components.
Directives

Angular templates are dynamic. When Angular renders them, it transforms the DOM according to the instructions given by directives.
A directive is a class with a @Directive annotation. A component is a
directive with a template; a @Component annotation is actually a
@Directive annotation extended with template-oriented features.
While a component is technically a directive, this architectural overview separates components from directives because components are a distinctive part of, and central to, Angular apps.
Two other kinds of directives exist: structural and attribute directives.
They tend to appear within an element tag in the same way as attributes, sometimes specified by name but more often as the target of an assignment or a binding.
Structural directives alter layout by adding, removing, and replacing elements in the DOM.
The example template uses two built-in structural directives:
lib/src/hero_list_component.html (structural)
<li *ngFor="let hero of heroes"></li>
<hero-detail *ngIf="selectedHero != null"></hero-detail>-
*ngFortells Angular to stamp out one<li>per hero in theheroeslist. -
*ngIfincludes theHeroDetailcomponent only if a selected hero exists.
In Dart, the only value that is true is the boolean value true; all
other values are false. JavaScript and TypeScript, by contrast, treat values
such as 1 and most non-null objects as true. For this reason, the JavaScript
and TypeScript versions of this app can use just selectedHero as the value
of the *ngIf expression. The Dart version must use a boolean operator such
as != instead.
Attribute directives alter the appearance or behavior of an existing element. In templates they look like regular HTML attributes, hence the name.
The ngModel directive, which implements two-way data binding, is
an example of an attribute directive. ngModel modifies the behavior of
an existing element (typically an <input>)
by setting its display value property and responding to change events.
lib/src/hero_detail_component.html (ngModel)
<input [(ngModel)]="hero.name">Angular has a few more directives that either alter the layout structure (for example, ngSwitch) or modify aspects of DOM elements and components (for example, ngStyle and ngClass).
You can also write your own directives. Components such as
HeroListComponent are one kind of custom directive.
Custom structural directives
are another.
Services

Service is a broad category encompassing any value, function, or feature that your app needs.
Almost anything can be a service. A service is typically a class with a narrow,
well-defined purpose. It should do something specific and do it well.
Examples include:
- logging service
- data service
- message bus
- tax calculator
- app configuration
There is nothing specifically Angular about services. Angular has no definition of a service. There is no service base class, and no place to register a service. Yet services are fundamental to any Angular app. Components are big consumers of services.
Here’s an example of a service class that logs to the browser console:
lib/src/logger_service.dart (class)
class Logger {
  void log(Object msg) => window.console.log(msg);
  void error(Object msg) => window.console.error(msg);
  void warn(Object msg) => window.console.warn(msg);
}
Here’s a HeroService that uses a Future to fetch heroes.
The HeroService depends on the Logger service and another BackendService
that handles the server communication grunt work.
lib/src/hero_service.dart (class)
class HeroService {
  final BackendService _backendService;
  final Logger _logger;
  List<Hero> heroes;

  HeroService(this._logger, this._backendService);

  Future<List<Hero>> getAll() async {
    heroes = await _backendService.getAll(Hero);
    _logger.log('Fetched ${heroes.length} heroes.');
    return heroes;
  }
}
Services are everywhere.
Component classes should be lean. They don’t fetch data from the server, validate user input, or log directly to the console. A component’s job is to enable the user experience and nothing more. It mediates between the view (rendered by the template) and the application logic (which often includes some notion of a model). A good component presents properties and methods for data binding. It delegates everything nontrivial to services.
Angular doesn’t enforce these principles. It doesn’t complain if you write a component with 3000 lines of code that does everything in your app.
Angular does help you follow these principles by making it easy to factor your application logic into services and make those services available to components through dependency injection.
Dependency injection

Dependency injection is a way to supply a new instance of a class
with the fully-formed dependencies it requires. Most dependencies are services.
Angular uses dependency injection to provide new components with the services
they need.
Angular can tell which services a component needs by looking at the types of its
constructor parameters. For example, the constructor of the example
HeroListComponent needs a HeroService:
lib/src/hero_list_component.dart (constructor)
final HeroService _heroService;

HeroListComponent(this._heroService);
When Angular creates a component, it first asks an injector for the services that the component requires. An injector maintains a container of service instances that it has previously created. If a requested service instance is not in the container, the injector makes one and adds it to the container before returning the service to Angular. When all requested services have been resolved and returned, Angular can call the component’s constructor with those services as arguments. This is dependency injection.
The process of HeroService injection looks a bit like this:
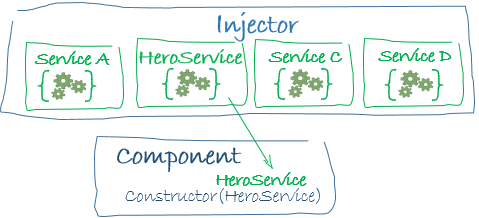
If the injector doesn’t have a HeroService, how does it know how to make one?
In brief, you must register a provider of the HeroService with the
injector. A provider can create or return a service, and is often the service
class itself.
You can register providers with a component, or through the root injector when the app is launched.
Registering providers with a component
The most common way to register providers is at the component level using the
providers argument of the @Component annotation:
lib/app_component.dart (providers)
@Component(
  // ···
  providers: [
    ClassProvider(BackendService),
    ClassProvider(HeroService),
    ClassProvider(Logger),
  ],
)
class AppComponent {}
Registering the provider with a component means you get a new instance of the service with each new instance of that component. A service provided through a component is shared with all of the component’s descendants in the app component tree.
Registering providers with the root injector
Registering providers with the root injector is much less common. For details, see the registering a service provider section of Dependency Injection.
Points to remember about dependency injection:
-
Dependency injection is wired into the Angular framework and used everywhere.
- The injector is the main mechanism.
- An injector maintains a container of the service instances that it created.
- An injector can create a new service instance from a provider.
-
A provider is a recipe for creating a service.
- You register providers with injectors.
Wrapup
You’ve learned the basics about the eight main building blocks of an Angular app:
That’s a foundation for everything else in an Angular app, and it’s more than enough to get going. But it doesn’t include everything you need to know.
Here is a brief, alphabetical list of other important Angular features and services.
-
Forms: Support complex data entry scenarios with HTML-based validation and dirty checking.
-
HTTP: Communicate with a server to get data, save data, and invoke server-side actions with an HTTP client.
-
Lifecycle hooks: Tap into key moments in the lifetime of a component, from its creation to its destruction, by implementing the lifecycle hook interfaces.
-
Pipes: Improve the user experience by transforming values for display.
-
Router: Navigate from page to page within the client app and never leave the browser.
-
Testing: Write component tests and end-to-end tests for your app.