
Routing 6.0
There are new requirements for the Tour of Heroes app:
- Add a Dashboard view.
- Add the ability to navigate between the Heroes and Dashboard views.
- When users click a hero name in either view, navigate to a detail view of the selected hero.
- When users click a deep link in an email, open the detail view for a particular hero.
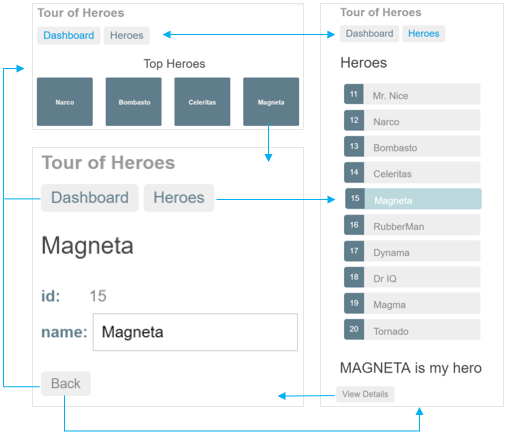
When you’re done, users will be able to navigate the app like this:
To satisfy these requirements, you’ll add Angular’s router to the app.
For more information about the router, read the Routing and Navigation page.
When you’re done with this page, the app should look like this live example (view source).
Where you left off
Before continuing with the Tour of Heroes, verify that you have the following structure.
- angular_tour_of_heroes
- lib
- app_component.{css,dart,html}
- src
- hero.dart
- hero_component.dart
- hero_service.dart
- mock_heroes.dart
- test
- …
- web
- index.html
- main.dart
- styles.css
- analysis_options.yaml
- pubspec.yaml
- lib
If the app isn’t running already, launch the app. As you make changes, keep it running by reloading the browser window.
Action plan
Here’s the plan:
- Turn
AppComponentinto an app shell that only handles navigation. - Relocate the Heroes concerns within the current
AppComponentto a separateHeroListComponent. - Add routing.
- Create a new
DashboardComponent. - Tie the Dashboard into the navigation structure.
Routing is another name for navigation. The router is the mechanism for navigating from view to view.
Splitting the AppComponent
The current app loads AppComponent and immediately displays the list of heroes.
The revised app should present a shell with a choice of views (Dashboard and Heroes)
and then default to one of them.
The AppComponent should only handle navigation, so you’ll
move the display of Heroes out of AppComponent and into its own HeroListComponent.
HeroListComponent
AppComponent is already dedicated to Heroes.
Instead of moving the code out of AppComponent, rename it to HeroListComponent
and create a separate AppComponent shell.
Do the following:
- Rename and move the
app_component.*files tosrc/hero_list_component.*. - Drop the
src/prefix from import paths. - Rename the
AppComponentclass toHeroListComponent(rename locally, only in this file). - Rename the selector
my-apptomy-heroes. - Change the template URL to
hero_list_component.htmland style file tohero_list_component.css.
lib/src/hero_list_component.dart (showing renamings only)
@Component(
  selector: 'my-heroes',
  templateUrl: 'hero_list_component.html',
  styleUrls: ['hero_list_component.css'],
  // ···
)
class HeroListComponent implements OnInit {
  // ···
  HeroListComponent(this._heroService);
  // ···
}
Create AppComponent
The new AppComponent is the app shell.
It will have some navigation links at the top and a display area below.
Perform these steps:
- Create the file
lib/app_component.dart. - Define an
AppComponentclass. - Add an
@Componentannotation above the class with amy-appselector. - Move the following from the hero list component to the app component:
- The
titleclass property. - The template
<h1>element, which contains a binding totitle.
- The
- Add a
<my-heroes>element to the app template just below the heading so you still see the heroes. - Add
HeroListComponentto thedirectiveslist ofAppComponentso Angular recognizes the<my-heroes>tags. - Add
HeroServiceto theproviderslist ofAppComponentbecause you’ll need it in every other view. - Remove
HeroServicefrom theHeroListComponentproviderslist since it was promoted. - Add the supporting
importstatements forAppComponent.
The first draft looks like this:
lib/app_component.dart
import 'package:ngdart/angular.dart';

import 'src/hero_service.dart';
import 'src/hero_list_component.dart';

@Component(
  selector: 'my-app',
  template: '''
    <h1>{{title}}</h1>
    <my-heroes></my-heroes>
  ''',
  directives: [HeroListComponent],
  providers: [ClassProvider(HeroService)],
)
class AppComponent {
  final title = 'Tour of Heroes';
}
open_in_browser Refresh the browser. The app still runs and displays heroes.
Add routing
Instead of displaying automatically, heroes should display after users click a button. In other words, users should be able to navigate to the list of heroes.
Update the pubspec
Use the Angular router ([ngrouter][]) to enable navigation. Since the router is in its own package, first add the package to the app’s pubspec:
Not all apps need routing, which is why the Angular router is in a separate, optional package.
Import the library
The Angular router is a combination of multiple services (routerProviders/routerProvidersHash), directives (routerDirectives), and configuration classes. You get them all by importing the router library:
lib/app_component.dart (angular_router)
import 'package:ngrouter/ngrouter.dart';Make the router available
To tell Angular that your app uses the router, pass as an argument to runApp()
an injector seeded with routerProvidersHash:
web/main.dart
import 'package:ngdart/angular.dart';
import 'package:ngrouter/ngrouter.dart';
import 'package:angular_tour_of_heroes/app_component.template.dart' as ng;

import 'main.template.dart' as self;

@GenerateInjector(
  routerProvidersHash, // You can use routerProviders in production
)
final InjectorFactory injector = self.injector$Injector;

void main() {
  runApp(ng.AppComponentNgFactory, createInjector: injector);
}
Which location strategy to use
The default LocationStrategy is PathLocationStrategy so, in production, you can use routerProviders. During development, it is more convenient to use routerProvidersHash (which has a HashLocationStrategy provider override for LocationStrategy) because webdev serve does not support deep linking. See the Router Appendix on LocationStrategy and browser URL styles for details.
<base href>
Open index.html and ensure there is a <base href="..."> element
(or a script that dynamically sets this element)
at the top of the <head> section.
As explained in the Set the base href section of the Routing and Navigation page, the example apps use the following script:
web/index.html (base-href)
<head>
  <script>
    // WARNING: DO NOT set the <base href> like this in production!
    // Details: https://webdev.dartlang.org/angular/guide/router
    (function () {
      var m = document.location.pathname.match(/^(\/[-\w]+)+\/web($|\/)/);
      document.write('<base href="' + (m ? m[0] : '/') + '" />');
    }());
  </script>
Configure routes
Routes tell the router which views to display when a user clicks a link or pastes a URL into the browser address bar.
First create a file to hold route paths. Initialize it with this content:
lib/src/route_paths.dart
import 'package:ngrouter/ngrouter.dart';

class RoutePaths {
  static final heroes = RoutePath(path: 'heroes');
}
As a first route, define a route to the heroes component:
lib/src/routes.dart (a first route)
import 'package:ngrouter/ngrouter.dart';

import 'route_paths.dart';
import 'hero_list_component.template.dart' as hero_list_template;

export 'route_paths.dart';

class Routes {
  static final heroes = RouteDefinition(
    routePath: RoutePaths.heroes,
    component: hero_list_template.HeroListComponentNgFactory,
  );

  static final all = <RouteDefinition>[
    heroes,
  ];

  static final heroRoute = <RouteDefinition>[hero];
}
The Routes.all field is a list of route definitions.
It contains only one route, but you’ll be adding more routes shortly.
The heroes RouteDefinition has the following named arguments:
-
routePath: The router matches this path against the URL in the browser address bar (heroes). -
component: The (factory of the) component that will be activated when this route is navigated to (hero_list_template.HeroListComponentNgFactory).
Read more about defining routes in the Routing & Navigation page.
The Angular compiler generates component factories behind the scenes when you build the app. To access the factory you need to import the generated component template file:
import 'hero_list_component.template.dart' as hero_list_template;Until you’ve built the app, the generated files don’t exist. The analyzer normally reports a missing import as an error, but we’ve disabled this error using the following configuration:
<?fixme-code-excerpt “analysis_options.yaml” retain=”/analyzer:|errors:|uri/” plaster=”none” title?>
  analyzer:
    errors:
      uri_has_not_been_generated: ignore
By naming the import (hero_list_template) you can use the not-yet-generated
component factory without an error from the analyzer
Router outlet
When you visit localhost:8080/#/heroes,
the router should match the URL to the heroes route and display a HeroListComponent.
However, you have to tell the router where to display the component.
To do this, open app_component.dart and make the following changes:
- Add routerDirectives to the directives list. RouterOutlet is one of
the
routerDirectives. - Add a
<router-outlet>element at the end of the template. The router displays each component immediately below the<router-outlet>as users navigate through the app. - Remove
<my-heroes>from the template becauseAppComponentwon’t directly display heroes, that’s the router’s job. - Remove
HeroListComponentfrom the directives list.
The <router-outlet> takes a list of routes as input, so make these changes:
- Import the app routes.
- Add an
exportsargument to the@Componentannotation, and exportRoutePathsandRoutes(you’ll be usingRoutePathsshortly). - In the template, bind the
routesproperty of the<router-outlet>toRoutes.all.
The app component code should look like this:
lib/app_component.dart (routes and template)
import 'src/routes.dart';

@Component(
  // ···
  template: ''' ···
    <router-outlet [routes]="Routes.all"></router-outlet>
  ''',
  // ···
  directives: [routerDirectives],
  providers: [ClassProvider(HeroService)],
  exports: [RoutePaths, Routes],
)
class AppComponent {
  final title = 'Tour of Heroes';
}
open_in_browser Refresh the browser, then visit localhost:8080/#/heroes. You should see the heroes list.
Router links
Users shouldn’t have to paste a route path into the address bar.
Instead, add an anchor to the template that, when clicked,
triggers navigation to HeroListComponent.
The revised template looks like this:
lib/app_component.dart (template)
template: '''
  <h1>{{title}}</h1>
  <nav>
    <a [routerLink]="RoutePaths.heroes.toUrl()"
       [routerLinkActive]="'active'">Heroes</a>
  </nav>
  <router-outlet [routes]="Routes.all"></router-outlet>
''',
Note the routerLink property binding in the anchor tag. The RouterLink directive
is bound to an expression whose string value that tells the router where to navigate to when the user
clicks the link.
Looking back at the route definitions, you can confirm that
'heroes' is the path of the route to the HeroListComponent.
open_in_browser
Refresh the browser. The browser displays the app title and heroes link,
but not the heroes list. Click the Heroes navigation link. The address bar
updates to /#/heroes (or the equivalent /#heroes),
and the list of heroes displays.
AppComponent now looks like this:
lib/app_component.dart
import 'package:ngdart/angular.dart';
import 'package:ngrouter/ngrouter.dart';

import 'src/hero_service.dart';
import 'src/routes.dart';

@Component(
  selector: 'my-app',
  template: '''
    <h1>{{title}}</h1>
    <nav>
      <a [routerLink]="RoutePaths.heroes.toUrl()"
         [routerLinkActive]="'active'">Heroes</a>
    </nav>
    <router-outlet [routes]="Routes.all"></router-outlet>
  ''',
  directives: [routerDirectives],
  providers: [ClassProvider(HeroService)],
  exports: [RoutePaths, Routes],
)
class AppComponent {
  final title = 'Tour of Heroes';
}
The AppComponent has a router and displays routed views. For this reason, and to distinguish it from other kinds of components, this component type is called a router component.
Add a dashboard
Routing only makes sense when multiple views exist.
To add another view, create a placeholder DashboardComponent.
lib/src/dashboard_component.dart (v1)
import 'package:ngdart/angular.dart';

@Component(
  selector: 'my-dashboard',
  template: '<h3>Dashboard</h3>',
)
class DashboardComponent {}
You’ll make this component more useful later.
Configure the dashboard route
Add a dashboard route similar to the heroes route by adding a path and then creating a route definition.
lib/src/route_paths.dart (dashboard)
static final dashboard = RoutePath(path: 'dashboard');lib/src/routes.dart (dashboard)
static final dashboard = RouteDefinition(
  routePath: RoutePaths.dashboard,
  component: dashboard_template.DashboardComponentNgFactory,
);
// ···
static final all = <RouteDefinition>[
  dashboard,
  // ···
];
You’ll also need to import the compiled dashboard template:
lib/src/routes.dart (dashboard_template)
import 'dashboard_component.template.dart' as dashboard_template;Add a redirect route
Currently, the browser launches with / in the address bar.
When the app starts, it should show the dashboard and
display the /#/dashboard path in the address bar.
To make this happen, add a redirect route:
lib/src/routes.dart (redirect route)
static final all = <RouteDefinition>[
  // ···
  RouteDefinition.redirect(
    path: '',
    redirectTo: RoutePaths.dashboard.toUrl(),
  ),
];
Alternatively, you could define Dashboard as a default route.
Read more about
default routes and
redirects in the
Routing & Navigation page.
Add navigation to the dashboard
Add a dashboard link to the app component template, just above the heroes link.
lib/app_component.dart (template)
template: '''
  <h1>{{title}}</h1>
  <nav>
    <a [routerLink]="RoutePaths.dashboard.toUrl()"
       [routerLinkActive]="'active'">Dashboard</a>
    <a [routerLink]="RoutePaths.heroes.toUrl()"
       [routerLinkActive]="'active'">Heroes</a>
  </nav>
  <router-outlet [routes]="Routes.all"></router-outlet>
''',
The <nav> element and the routerLinkActive directives don’t do anything yet,
but they’ll be useful later when you style the links.
open_in_browser Refresh the browser, then visit localhost:8080/. The app displays the dashboard and you can navigate between the dashboard and the heroes list.
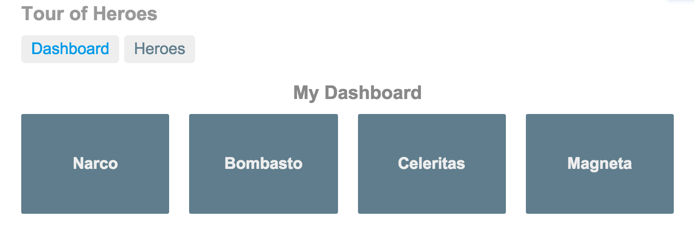
Add heroes to the dashboard
To make the dashboard more interesting, you’ll display the top four heroes at a glance.
Replace the template metadata with a templateUrl property that points to a new
template file, and add the directives shown below (you’ll add the necessary imports soon):
lib/src/dashboard_component.dart (metadata)
@Component(
  selector: 'my-dashboard',
  templateUrl: 'dashboard_component.html',
  // ···
  directives: [coreDirectives],
)
The value of templateUrl can be an asset in this package or another
package. To refer to an asset from another package, use a full package reference,
such as 'package:some_other_package/dashboard_component.html'.
Create the template file with this content:
lib/src/dashboard_component.html
<h3>Top Heroes</h3>
<div class="grid grid-pad">
  <div *ngFor="let hero of heroes">
    <div class="module hero">
      <h4>{{hero.name}}</h4>
    </div>
  </div>
</div>
*ngFor is used again to iterate over a list of heroes and display their names.
The extra <div> elements will help with styling later.
Reusing the HeroService
To populate the component’s heroes list, you can reuse the HeroService.
Earlier, you removed the HeroService from the providers list of HeroListComponent
and added it to the providers list of AppComponent.
That move created a singleton HeroService instance, available to all components of the app.
Angular injects HeroService and you can use it in the DashboardComponent.
Get heroes
In dashboard_component.dart, add the following import statements.
lib/src/dashboard_component.dart (imports)
import 'package:ngdart/angular.dart';

import 'hero.dart';
import 'hero_service.dart';
Now create the DashboardComponent class like this:
lib/src/dashboard_component.dart (class)
class DashboardComponent implements OnInit {
  List<Hero> heroes = <Hero>[];

  final HeroService _heroService;

  DashboardComponent(this._heroService);

  @override
  void ngOnInit() async {
    heroes = (await _heroService.getAll()).skip(1).take(4).toList();
  }
}
You’re using the same kind of features for the dashboard as you did for the heroes component:
- Define a
heroeslist property. - Inject a
HeroServicein the constructor, saving it to a private field. - Call the service to get heroes inside the Angular
ngOnInit()lifecycle hook.
In this dashboard you specify four heroes (2nd, 3rd, 4th, and 5th).
open_in_browser Refresh the browser to see four hero names in the new dashboard.
Navigating to hero details
While the details of a selected hero display at the bottom of the HeroListComponent,
users should be able to navigate to a HeroComponent in the following additional ways:
- From the dashboard to a selected hero.
- From the heroes list to a selected hero.
- From a “deep link” URL pasted into the browser address bar.
Routing to a hero detail
You can add a route to the HeroComponent in AppComponent, where the other routes are defined.
The new route is unusual in that you must tell the HeroComponent which hero to show.
You didn’t have to tell the HeroListComponent or the DashboardComponent anything.
Currently, the parent HeroListComponent sets the component’s hero property to a
hero object with a binding like this:
<my-hero [hero]="selected"></my-hero>But this binding won’t work in any of the routing scenarios.
Parameterized route
You can add the hero’s ID to the route path. When routing to the hero whose ID is 11, you could expect to see a path such as this:
/heroes/11
The /heroes/ part is constant. The trailing numeric ID changes from hero to hero.
You need to represent the variable part of the route with a parameter that stands for the hero’s ID.
Add a route with a parameter
First, define the route path:
lib/src/route_paths.dart (hero)
const idParam = 'id';

class RoutePaths {
  // ···
  static final hero = RoutePath(path: '${heroes.path}/:$idParam');
}
The colon (:) in the path indicates that :$idParam (:id) is a placeholder
for a specific hero ID when navigating to hero view.
In the routes file, import the hero detail component template:
lib/src/routes.dart (hero_template)
import 'hero_component.template.dart' as hero_template;Next, add the following route:
lib/src/routes.dart (hero)
static final hero = RouteDefinition(
  routePath: RoutePaths.hero,
  component: hero_template.HeroComponentNgFactory,
);
// ···
static final all = <RouteDefinition>[ // ···
  hero, // ···
];
You’re finished with the app routes.
You didn’t add a hero detail link to the template because users
don’t click a navigation link to view a particular hero;
they click a hero name, whether the name is displayed on the dashboard or in the heroes list.
But this won’t work until the HeroComponent
is revised and ready to be navigated to.
Revise HeroComponent
Here’s what the HeroComponent looks like now:
lib/src/hero_component.dart (current)
import 'package:ngdart/angular.dart';
import 'package:ngforms/ngforms.dart';

import 'hero.dart';

@Component(
  selector: 'my-hero',
  template: '''
    <div *ngIf="hero != null">
      <h2>{{hero!.name}}</h2>
      <div><label>id: </label>{{hero!.id}}</div>
      <div>
        <label>name: </label>
        <input [(ngModel)]="hero!.name" placeholder="name"/>
      </div>
    </div>
  ''',
  directives: [coreDirectives, formDirectives],
)
class HeroComponent {
  @Input()
  Hero? hero;

  void bruh(Hero? h) {
    if (h != null) {
      print(h.name);
    }
  }
}
The template won’t change. Hero names will display the same way. The major changes are driven by how you get hero names.
Drop @Input()
You will no longer receive the hero in a parent component property binding, so
you can remove the @Input() annotation from the hero field:
lib/src/hero_component.dart (hero with @Input removed)
class HeroComponent {
  Hero? hero;
}
Add onActivate() life-cycle hook
The new HeroComponent will take the id parameter from the router’s
state and use the HeroService to fetch the hero with that id.
Add the following imports:
lib/src/hero_component.dart (added-imports)
import 'package:ngrouter/ngrouter.dart';
// ···
import 'hero_service.dart';
import 'route_paths.dart';
Inject the HeroService and Location service
into the constructor, saving their values in private fields:
lib/src/hero_component.dart (constructor)
final HeroService _heroService;
final Location _location;

HeroComponent(this._heroService, this._location);
To get notified when a hero route is navigated to, make HeroComponent
implement the OnActivate interface, and update hero from
the onActivate() router lifecycle hook:
lib/src/hero_component.dart (OnActivate)
class HeroComponent implements OnActivate {
  // ···
  @override
  void onActivate(_, RouterState current) async {
    final id = getId(current.parameters);
    if (id != null) hero = await (_heroService.get(id));
  }
  // ···
}
The hook implementation makes use of the getId() helper function that
extracts the id from the RouterState.parameters map.
lib/src/route_paths.dart (getId)
int? getId(Map<String, String> parameters) {
  final id = parameters[idParam];
  return id == null ? null : int.tryParse(id);
}
The hero ID is a number. Route parameters are always strings. So the route parameter value is converted to a number.
Add HeroService.get()
In onActivate(), you used the get() method, which HeroService doesn’t
have yet. To fix this issue, open HeroService and add a get() method
that filters the heroes list from getAll() by id.
lib/src/hero_service.dart (get)
Future<Hero> get(int id) async =>
    (await getAll()).firstWhere((hero) => hero.id == id);
Find the way back
Users have several ways to navigate to the HeroComponent.
To navigate somewhere else, users can click one of the two links in the AppComponent or click the browser’s back button.
Now add a third option, a goBack() method that navigates backward one step in the browser’s history stack
using the Location service you injected previously.
lib/src/hero_component.dart (goBack)
void goBack() => _location.back();Going back too far could take users out of the app. In a real app, you can prevent this issue with the canDeactivate() hook. Read more on the CanDeactivate page.
You’ll wire this method with an event binding to a Back button that you’ll add to the component template.
<button (click)="goBack()">Back</button>Migrate the template to its own file called hero_component.html:
lib/src/hero_component.html
<div *ngIf="hero != null">
  <h2>{{hero!.name}}</h2>
  <div>
    <label>id: </label>{{hero!.id}}</div>
  <div>
    <label>name: </label>
    <input [(ngModel)]="hero!.name" placeholder="name" />
  </div>
  <button (click)="goBack()">Back</button>
</div>
Update the component metadata with a templateUrl pointing to the template file that you just created.
lib/src/hero_component.dart (metadata)
@Component(
  selector: 'my-hero',
  templateUrl: 'hero_component.html',
  // ···
  directives: [coreDirectives, formDirectives],
)
open_in_browser Refresh the browser and visit localhost:8080/#heroes/11. Details for hero 11 should be displayed. Selecting a hero in either the dashboard or the heroes list doesn’t work yet. You’ll deal with that next.
Select a dashboard hero
When a user selects a hero in the dashboard, the app should navigate to a
HeroComponent to allow the user to view and edit the selected hero.
The dashboard heroes should behave like anchor tags: when hovering over a hero name, the target URL should display in the browser status bar and the user should be able to copy the link or open the hero detail view in a new tab.
To achieve this, you’ll need to make changes to the dashboard component and its template.
Update the dashboard component:
- Import
route_paths.dart - Add
routerDirectivesto thedirectiveslist - Add the following method:
lib/src/dashboard_component.dart (heroUrl)
String heroUrl(int id) => RoutePaths.hero.toUrl(parameters: {idParam: '$id'});Edit the dashboard template:
- Replace the
divopening and closing tags in the<div *ngFor...>element with anchor tags. - Add a router link property binding, as shown.
lib/src/dashboard_component.html (repeated <a> tag)
<a *ngFor="let hero of heroes" class="col-1-4"
   [routerLink]="heroUrl(hero.id)">
  <div class="module hero">
    <h4>{{hero.name}}</h4>
  </div>
</a>
As described in the Router links section of this page,
top-level navigation in the AppComponent template has router links set to
paths like, /dashboard and /heroes. This time, you’re binding to the
parameterized hero path you defined earlier:
const idParam = 'id';

class RoutePaths {
  // ···
  static final hero = RoutePath(path: '${heroes.path}/:$idParam');
}
The heroUrl() method generates the string representation of the path using the
toUrl() method, passing route parameter values using a map literal. For
example, it returns /heroes/15 when id is 15.
open_in_browser Refresh the browser and select a hero from the dashboard; the app navigates to that hero’s details.
Select a hero in the HeroListComponent
In the HeroListComponent,
the current template exhibits a “master/detail” style with the list of heroes
at the top and details of the selected hero below.
lib/src/hero_list_component.html
<h2>Heroes</h2>
<ul class="heroes">
  <li *ngFor="let hero of heroes"
      [class.selected]="hero == selected"
      (click)="onSelect(hero)">
    <span class="badge">{{hero.id}}</span> {{hero.name}}
  </li>
</ul>
<my-hero [hero]="selected"></my-hero>
You’ll no longer show the full HeroComponent here.
Instead, you’ll display the hero detail on its own page and route to it as you did in the dashboard.
Make these changes:
- Remove the
<my-hero>element from the last line of the template. - Remove
HeroComponentfrom list ofdirectives. - Remove the hero detail import.
When users select a hero from the list, they won’t go to the detail page. Instead, they’ll see a mini detail on this page and have to click a button to navigate to the full detail page.
Add the mini detail
Add the following HTML fragment at the bottom of the template where the <my-hero> used to be:
lib/src/hero_list_component.html (mini detail)
<div *ngIf="selected != null">
  <h2>
    {{$pipe.uppercase(selected!.name)}} is my hero
  </h2>
  <button (click)="gotoDetail()">View Details</button>
</div>
Add the following import and method stub to HeroListComponent:
lib/src/hero_list_component.dart (gotoDetail stub)
import 'package:ngrouter/ngrouter.dart';
// ···
class HeroListComponent implements OnInit {
  // ···
  Future<NavigationResult> gotoDetail() => null;
}
After clicking a hero (but don’t try now since it won’t work yet), users should see something like this below the hero list:

The hero’s name is displayed in capital letters because of the uppercase pipe
that’s included in the interpolation binding, right after the pipe operator ( | ).
{{$pipe.uppercase(selected!.name)}} is my heroPipes are a good way to format strings, currency amounts, dates and other display data. Angular ships with several pipes and you can write your own.
warning Before you can use an Angular pipe in a
template, you need to list it in the pipes argument of your component’s
@Component annotation. You can add pipes
individually, or for convenience you can use groups like commonPipes.
lib/src/hero_list_component.dart (pipes)
@Component(
  selector: 'my-heroes',
  // ···
  pipes: [commonPipes],
)
Read more about pipes on the Pipes page.
open_in_browser Refresh the browser. Selecting a hero from the heroes list will activate the mini detail view. The view details button doesn’t work yet.
Update the HeroListComponent class
The HeroListComponent navigates to the HeroesDetailComponent in response to a button click.
The button’s click event is bound to a gotoDetail() method that should navigate imperatively
by telling the router where to go.
This approach requires the following changes to the component class:
- Import
route_paths.dart. - Inject the
Routerin the constructor, along with theHeroService. - Implement
gotoDetail()by calling the routernavigate()method.
Here’s the revised HeroListComponent class:
lib/src/hero_list_component.dart (class)
class HeroListComponent implements OnInit {
  final HeroService _heroService;
  final Router _router;
  List<Hero> heroes = <Hero>[];
  Hero? selected;

  HeroListComponent(this._heroService, this._router);

  Future<void> _getHeroes() async {
    heroes = await _heroService.getAll();
  }

  void ngOnInit() => _getHeroes();

  void onSelect(Hero hero) => selected = hero;

  String _heroUrl(int id) =>
      RoutePaths.hero.toUrl(parameters: {idParam: '$id'});

  Future<NavigationResult> gotoDetail() =>
      _router.navigate(_heroUrl(selected!.id));
}
open_in_browser Refresh the browser and start clicking. Users can navigate around the app, from the dashboard to hero details and back, from heroes list to the mini detail to the hero details and back to the heroes again.
You’ve met all of the navigational requirements that propelled this page.
Style the app
The app is functional but it needs styling. The dashboard heroes should display in a row of rectangles. You’ve received around 60 lines of CSS for this purpose, including some simple media queries for responsive design.
As you now know, adding the CSS to the component styles metadata
would obscure the component logic.
Instead, you’ll add the CSS to separate .css files.
Dashboard styles
Create a dashboard_component.css file in the lib/src folder and reference
that file in the component metadata’s styleUrls list property like this:
Hero detail styles
Create a hero_component.css file in the lib/src
folder and reference that file in the component metadata’s styleUrls list:
Style the navigation links
Create an app_component.css file in the lib folder
and reference that file in the component metadata’s styleUrls list:
The provided CSS makes the navigation links in the AppComponent look more like selectable buttons.
Earlier, you surrounded those links with a <nav> element,
and added a routerLinkActive directive to each anchor:
lib/app_component.dart (template)
template: '''
  <h1>{{title}}</h1>
  <nav>
    <a [routerLink]="RoutePaths.dashboard.toUrl()"
       [routerLinkActive]="'active'">Dashboard</a>
    <a [routerLink]="RoutePaths.heroes.toUrl()"
       [routerLinkActive]="'active'">Heroes</a>
  </nav>
  <router-outlet [routes]="Routes.all"></router-outlet>
''',
The router adds the class named by the RouterLinkActive directive to the HTML navigation element whose route matches the active route.
Global app styles
When you add styles to a component, you keep everything a component needs—HTML, the CSS, the code—together in one convenient place. It’s easy to package it all up and reuse the component somewhere else.
You can also create styles at the app level outside of any component.
The designers provided some basic styles to apply to elements across the entire app. These correspond to the full set of master styles that you installed earlier during setup. Here’s an excerpt:
web/styles.css (excerpt)
@import url(https://fonts.googleapis.com/css?family=Roboto);
@import url(https://fonts.googleapis.com/css?family=Material+Icons);

/* Master Styles */
h1 {
  color: #369;
  font-family: Arial, Helvetica, sans-serif;
  font-size: 250%;
}
h2, h3 {
  color: #444;
  font-family: Arial, Helvetica, sans-serif;
  font-weight: lighter;
}
body {
  margin: 2em;
}
body, input[text], button {
  color: #888;
  font-family: Cambria, Georgia;
}
/* ··· */
/* everywhere else */
* {
  font-family: Arial, Helvetica, sans-serif;
}
Create the file web/styles.css, if necessary.
Ensure that the file contains the master styles provided here.
Also edit web/index.html to refer to this stylesheet.
web/index.html (link ref)
<link rel="stylesheet" href="styles.css">Look at the app now. The dashboard, heroes, and navigation links are styled.
App structure and code
Review the sample source code in the live example (view source) for this page. Verify that you have the following structure:
- angular_tour_of_heroes
- lib
- app_component.{css,dart}
- src
- dashboard_component.{css,dart,html}
- hero.dart
- hero_component.{css,dart,html}
- hero_list_component.{css,dart,html}
- hero_service.dart
- mock_heroes.dart
- route_paths.dart
- routes.dart
- test
- …
- web
- index.html
- main.dart
- styles.css
- analysis_options.yaml
- pubspec.yaml
- lib
The road you’ve travelled
Here’s what you achieved in this page:
- You added the Angular router to navigate among different components.
- You learned how to create router links to represent navigation menu items.
- You used router link parameters to navigate to the details of the user-selected hero.
- You shared the
HeroServiceamong multiple components. - You added the
uppercasepipe to format data.
Your app should look like this live example (view source).
The road ahead
You have much of the foundation you need to build an app. You’re still missing a key piece: remote data access.
In the next page, you’ll replace the mock data with data retrieved from a server using http.